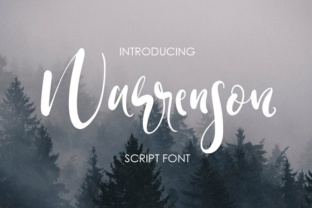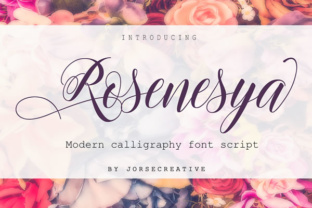
The Real Story Behind Rosenesya: What Most Users Overlook
You have seen plenty of calligraphy fonts that promise elegance. Many deliver stiff, predictable curves that look nothing like real handwriting. Rosenesya takes a different approach. It is a handwritten calligraphy script built around a varying baseline, which gives it that playful, human rhythm that so many designers chase. With over 450 glyphs and 219 alternate characters, it offers initial and terminal alternates, ligatures, and multilingual support. That is a lot of flexibility on paper. But flexibility means nothing if you do not understand how to use it well.
Mistaking Complexity for Difficulty
A common mistake people make when they first see Rosenesya is assuming the number of glyphs and alternates makes it complicated to use. They open the font map, see hundreds of characters, and feel overwhelmed. This leads to a frustrating pattern: either they avoid the alternates altogether, or they sprinkle them in randomly without any logic.
Neither approach serves your project well. When you ignore the alternates, you lose the very thing that makes Rosenesya stand out. When you use them randomly, you break the natural flow that the varying baseline creates.
What You Should Do Instead
Start by understanding how the font behaves in its default state. Type out a sentence and look at how the letters connect. Rosenesya is designed so that the standard characters already carry a good amount of elegance. Then, bring in alternates one at a time. Swap an initial letter here, a terminal flourish there. Test how each change affects the rhythm of the word. The goal is not to use as many alternates as possible. It is to use the right ones at the right moments.
For example, if you are working on a wedding invitation header, you might replace the default "S" with a flourished initial alternate to draw the eye. But you would leave the rest of the word in standard form so the design stays balanced rather than chaotic.
Ignoring the Varying Baseline
Rosenesya features a varying baseline by design. This means the letters do not sit perfectly on a straight line. They rise and fall slightly, like natural handwriting. This is what gives the font its playful, human feel. But many users try to force it onto a rigid grid.
Whether you are laying out text in a design tool or embedding the font on a website, fighting the baseline can make the text look uneven in a bad way. The letters can appear misaligned rather than artfully varied.
How to Work with the Baseline
Let the font breathe. When using Rosenesya in a design, avoid strict alignment tools that enforce a perfectly flat bottom edge. In print design, you can adjust letter spacing slightly to help the flow look intentional. In web design, use generous line height so the varying baseline does not clash with adjacent elements.
A common example is placing Rosenesya text inside a tightly cropped box. The letters near the edges may clip awkwardly because some glyphs dip lower than others. Instead, give the text container extra padding. Let the descenders fall where they want to fall.
Overlooking Multilingual Needs
Rosenesya includes multilingual support, which is a feature many users do not check until it is too late. If your project needs to display accented characters, Eastern European glyphs, or extended Latin sets, you want to confirm that Rosenesya covers those characters adequately.
I have seen designers fall in love with a font, build an entire brand around it, and then discover that the client's product name includes a character the font does not support. The result is a last-minute font swap that throws off the entire visual identity.
Check Before You Commit
Before you purchase or download Rosenesya, open the glyph list and search for the specific characters you need. If you are designing for an international audience, test a few full sentences in your target languages. Look for ligatures that might not render correctly across different platforms. The font does support many languages, but your specific use case deserves verification.
Using Rosenesya in the Wrong Project Type
Rosenesya is described as a font that breathes elegance and class. That is true. But elegance does not belong everywhere. I have seen small business owners try to use it for body text on a product label, and it becomes nearly unreadable at small sizes. The varying baseline and flourishes that look beautiful in a heading turn into a blurry mess when scaled down.
Where Rosenesya Shines
Think of Rosenesya as a display script. It works best for:
- Invitations and announcements
- Social media headers and quote graphics
- Product packaging accents
- Logo typography
- Short promotional phrases
For longer paragraphs or small text, pair it with a clean sans-serif or serif font. Let Rosenesya be the star in short bursts, and let a more readable font handle the heavy lifting. This approach keeps your design elegant without sacrificing legibility.
Neglecting Ligature Behavior Across Platforms
Rosenesya includes ligatures that help certain letter combinations flow together more naturally. But not every platform or application handles OpenType features the same way. You may design something in Adobe Illustrator that looks perfect, only to open it in a web browser and see broken ligatures or missing alternates.
Test in the Final Environment
If you are using Rosenesya for a website, test it directly in the browser on different operating systems. If you are using it for a print project, run a proof with the exact printer settings you plan to use. Some print services strip OpenType features during processing. A quick test saves you from delivering something that looks different from what you designed.
For web use, consider using a subset of the font that includes only the characters and alternates you actually need. This keeps file sizes manageable and reduces the chance of rendering issues.
Choosing Rosenesya Based Only on Looks
It is easy to fall in love with a font because of how it looks in a demo image. Rosenesya has beautiful promotional visuals. But the way a font appears in a polished showcase can be misleading. Those demos often use carefully chosen words and ideal spacing. Your real content may behave differently.
What to Evaluate Before Deciding
Type out your actual content in the font. Use your own brand name, your own product names, your own phrases. Look at how the letters connect in the specific combinations your content uses. Some letter pairs may not flow as smoothly as others. That is normal with any script font, but you want to know about it before you commit.
Pay attention to how Rosenesya handles punctuation, numbers, and uppercase-lowercase transitions. These details matter more than the aesthetic of a single demo word.
Failing to Balance Cost with Licensing
Rosenesya is a premium font, and its value comes from the depth of its glyph set and the design work behind it. But I have seen people buy it without fully understanding the licensing terms. They assume one purchase covers commercial use for all their clients. Then they find out they need an extended license for certain applications.
Read the License Before You Buy
Check whether your intended use is covered under the standard license. Do you need web embedding? App integration? Print-on-demand products? Each use case may require a different license tier. Factoring this into your decision early prevents unnecessary costs or legal headaches later.
A Practical Approach to Mastering Rosenesya
If you are serious about using Rosenesya well, take a structured approach. Start by exploring the full glyph set in a tool that shows OpenType features clearly. Type out common words from your projects and experiment with different alternates. Save a few settings presets for different use cases, such as one for formal invitations and another for casual social graphics.
When you understand how the varying baseline interacts with letter spacing and line height, you can make intentional choices rather than guessing. When you know which alternates work best for your content, you can apply them with confidence.
Rosenesya rewards those who take the time to learn its nuances. The 450-plus glyphs are not there to overwhelm you. They are there to give you control over the final look. Use that control wisely, and your projects will carry the elegance and class the font was designed to deliver.